

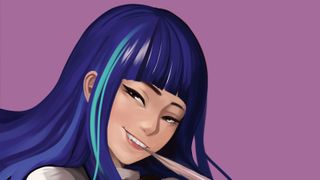
Drawing Anime Heads At Different Angles
17 tips for drawing manga faces
Manga faces are a vital part of drawing manga. I began my drawing career by learning how to draw manga. During this time I purchased many how-to guides for creating this distinctive art style, and discovered that the drawing methods were similar to those of western comic art. Essentially, you'd use a pencil to draw the head shape and then add lines to indicate the eye position and centre of the face. Once this construction sketch is complete the final line-art is created using ink.
I followed the same drawing method when I first explored digital art with a Wacom Graphire that a friend gave to me. Yet I couldn't get my hand-drawn line-art to look right and I had to use the Pen tool. The resulting line-art was clean, but it felt lifeless and lacked the energy that I would have wanted in the drawing.
After years of practice I gradually changed my method of drawing characters. Instead of working from a sketch and then moving to line-art before adding colours, I paint in greyscale, then adjust values and apply colours until I'm happy with the drawing. So here are some of my tips for drawing manga faces digitally.
For more advice on drawing, see this how to draw roundup of tutorials, or this post on how to draw manga.
01. Get set up

(Image: © Zakary Lee)
Spend a few minutes configuring your drawing tools before you get stuck into the creative process. For example, tablets have Pen Pressure set to maximum by default. You'll have to press down hard with the pen on the tablet's surface to hit maximum output. Drawing with the maximum Pressure and Threshold settings can result in wobbly lines. By adjusting my Pressure Threshold and reducing the maximum output Threshold to about 60 per cent of the Pressure, I can create steady lines without worrying about making my lines look consistent. For Wacom products, this setting is accessed through Wacom Tablet Properties, while for XP-PEN products access the PenWin/Mac driver.
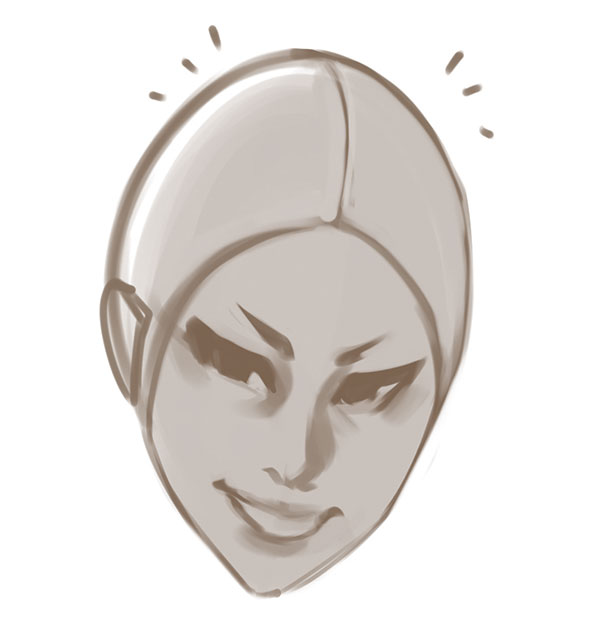
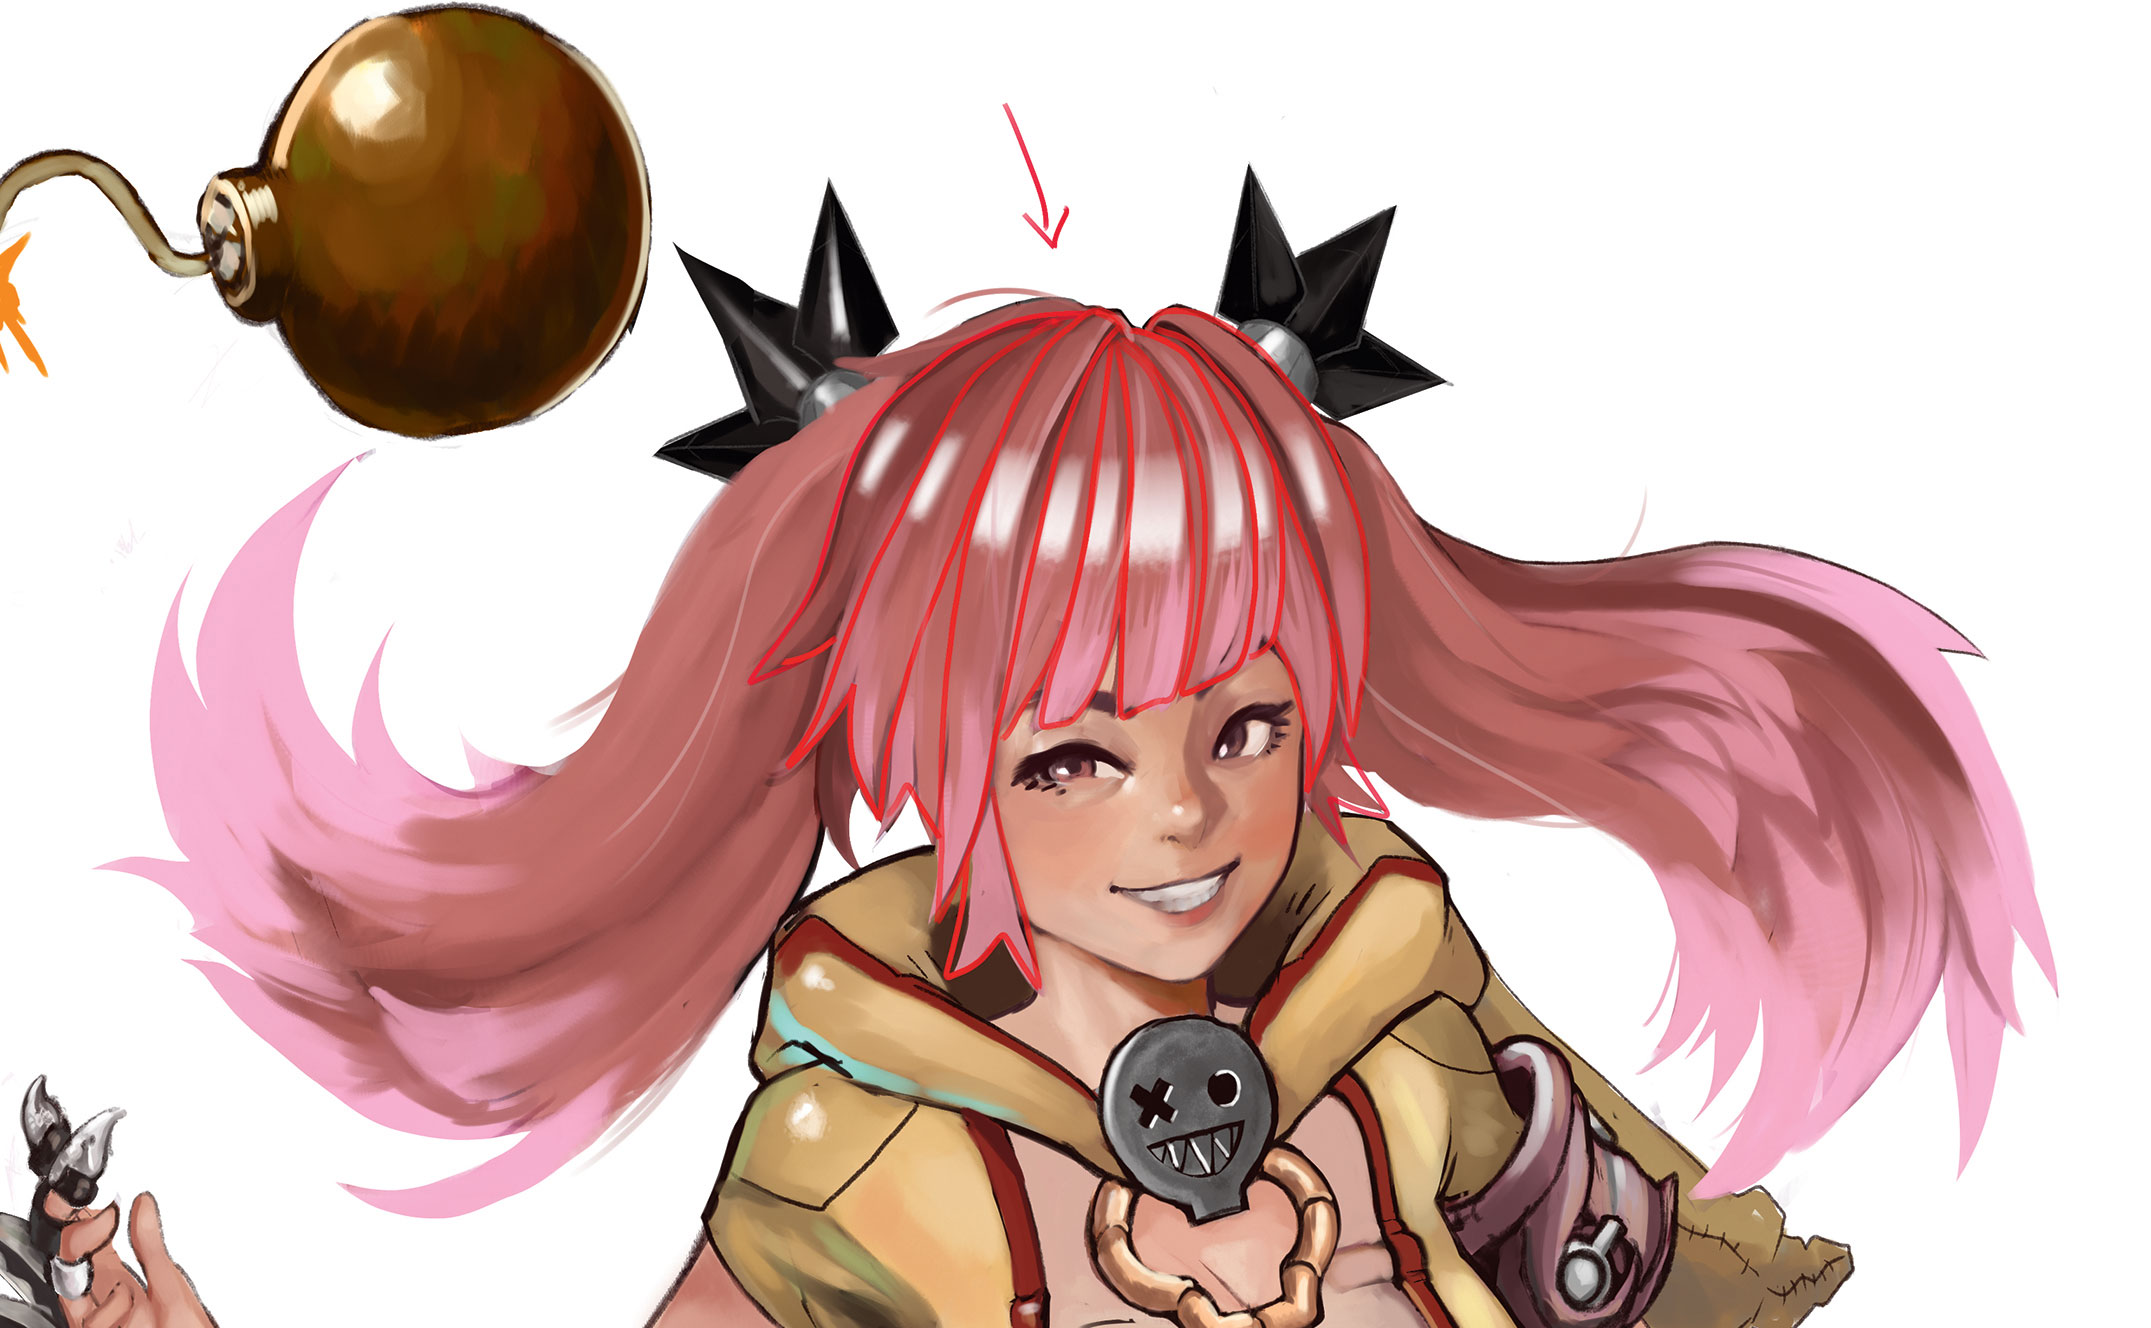
02. Use an arrow to place key facial features
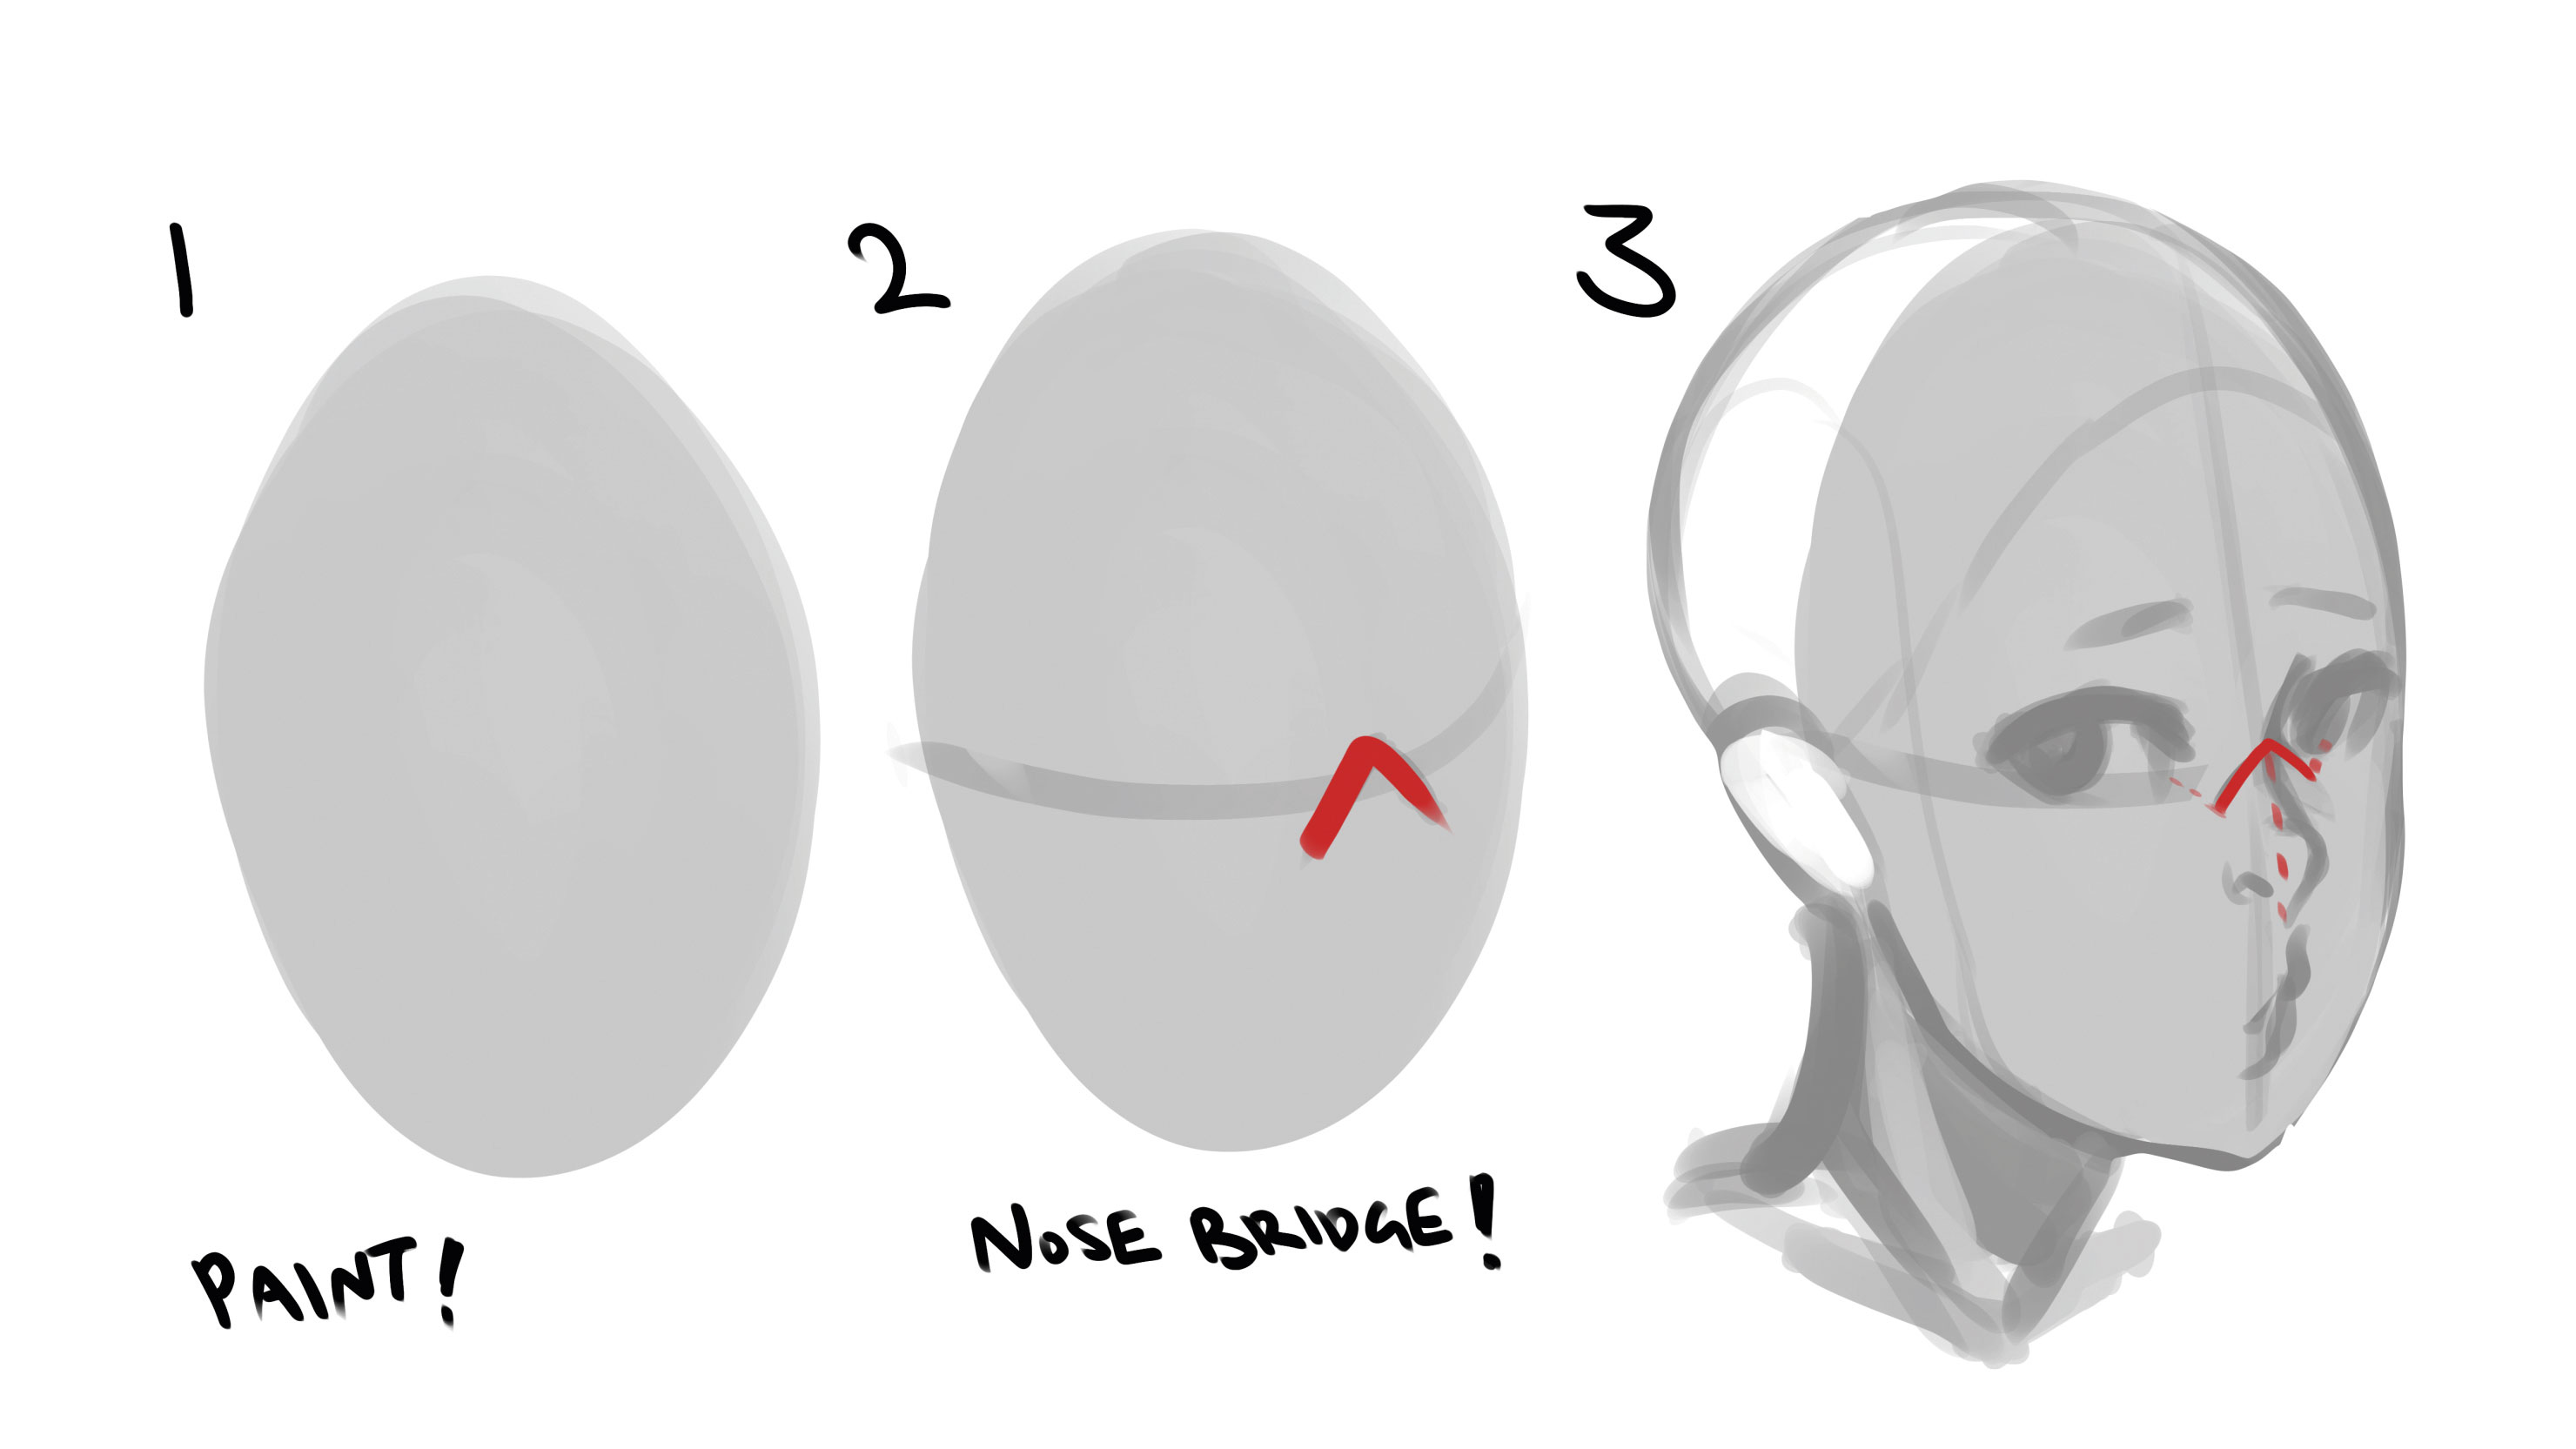
(Image: © Zakary Lee)
After blocking out the head (1) I decide which direction the character is facing. Treating the head as a 3D shape, I draw a horizontal line that curves along the surface. When I draw this line I bear in mind whether the head is tilted upwards or downwards, or facing left or right. To fix the direction of the head then I'll draw an upwards pointing arrow (2). This helps me locate where the nose bridge meets the root of the nose. Once this key location of the face has been identified, I can quickly paint and sketch in the centreline for the face, eyes, eyebrows, mouth and chin (3).
03. Use a painting approach to sketching heads
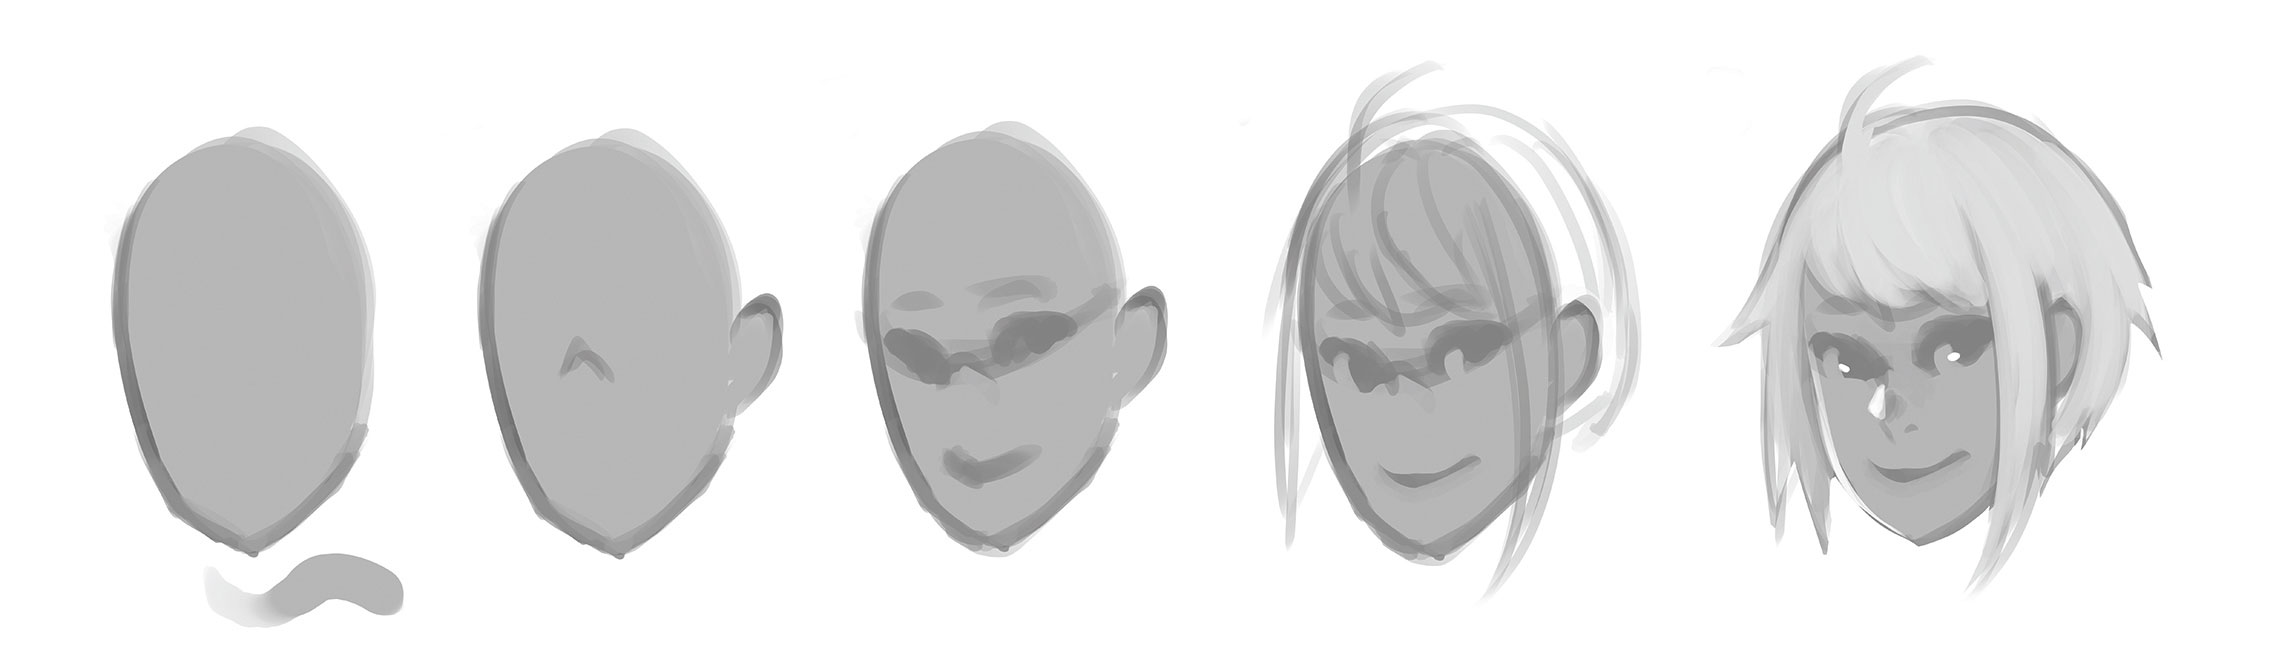
(Image: © Zakary Lee)
I paint my sketches instead of drawing them with fine lines. I use a big brush with about 60 to 80 per cent values to block in the head. Next, using a darker value, I'll outline the head and paint key features. I'll fine-tune the expression of the mouth and eyes by colour picking the grey tone and painting over the line. Finally, I'll refine the hair to get a sense of its shape, painting over lines to achieve the shape that I want.
04. Capture expressions in cartoons sketches
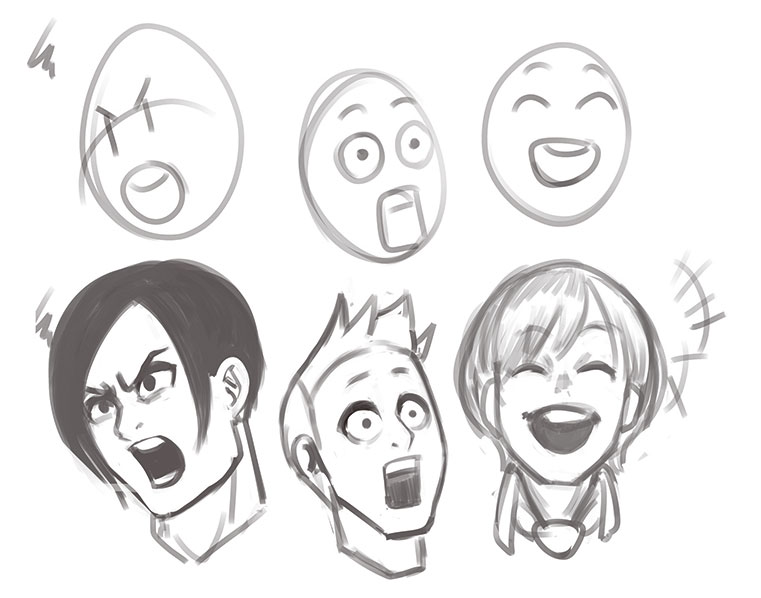
(Image: © Zakary Lee)
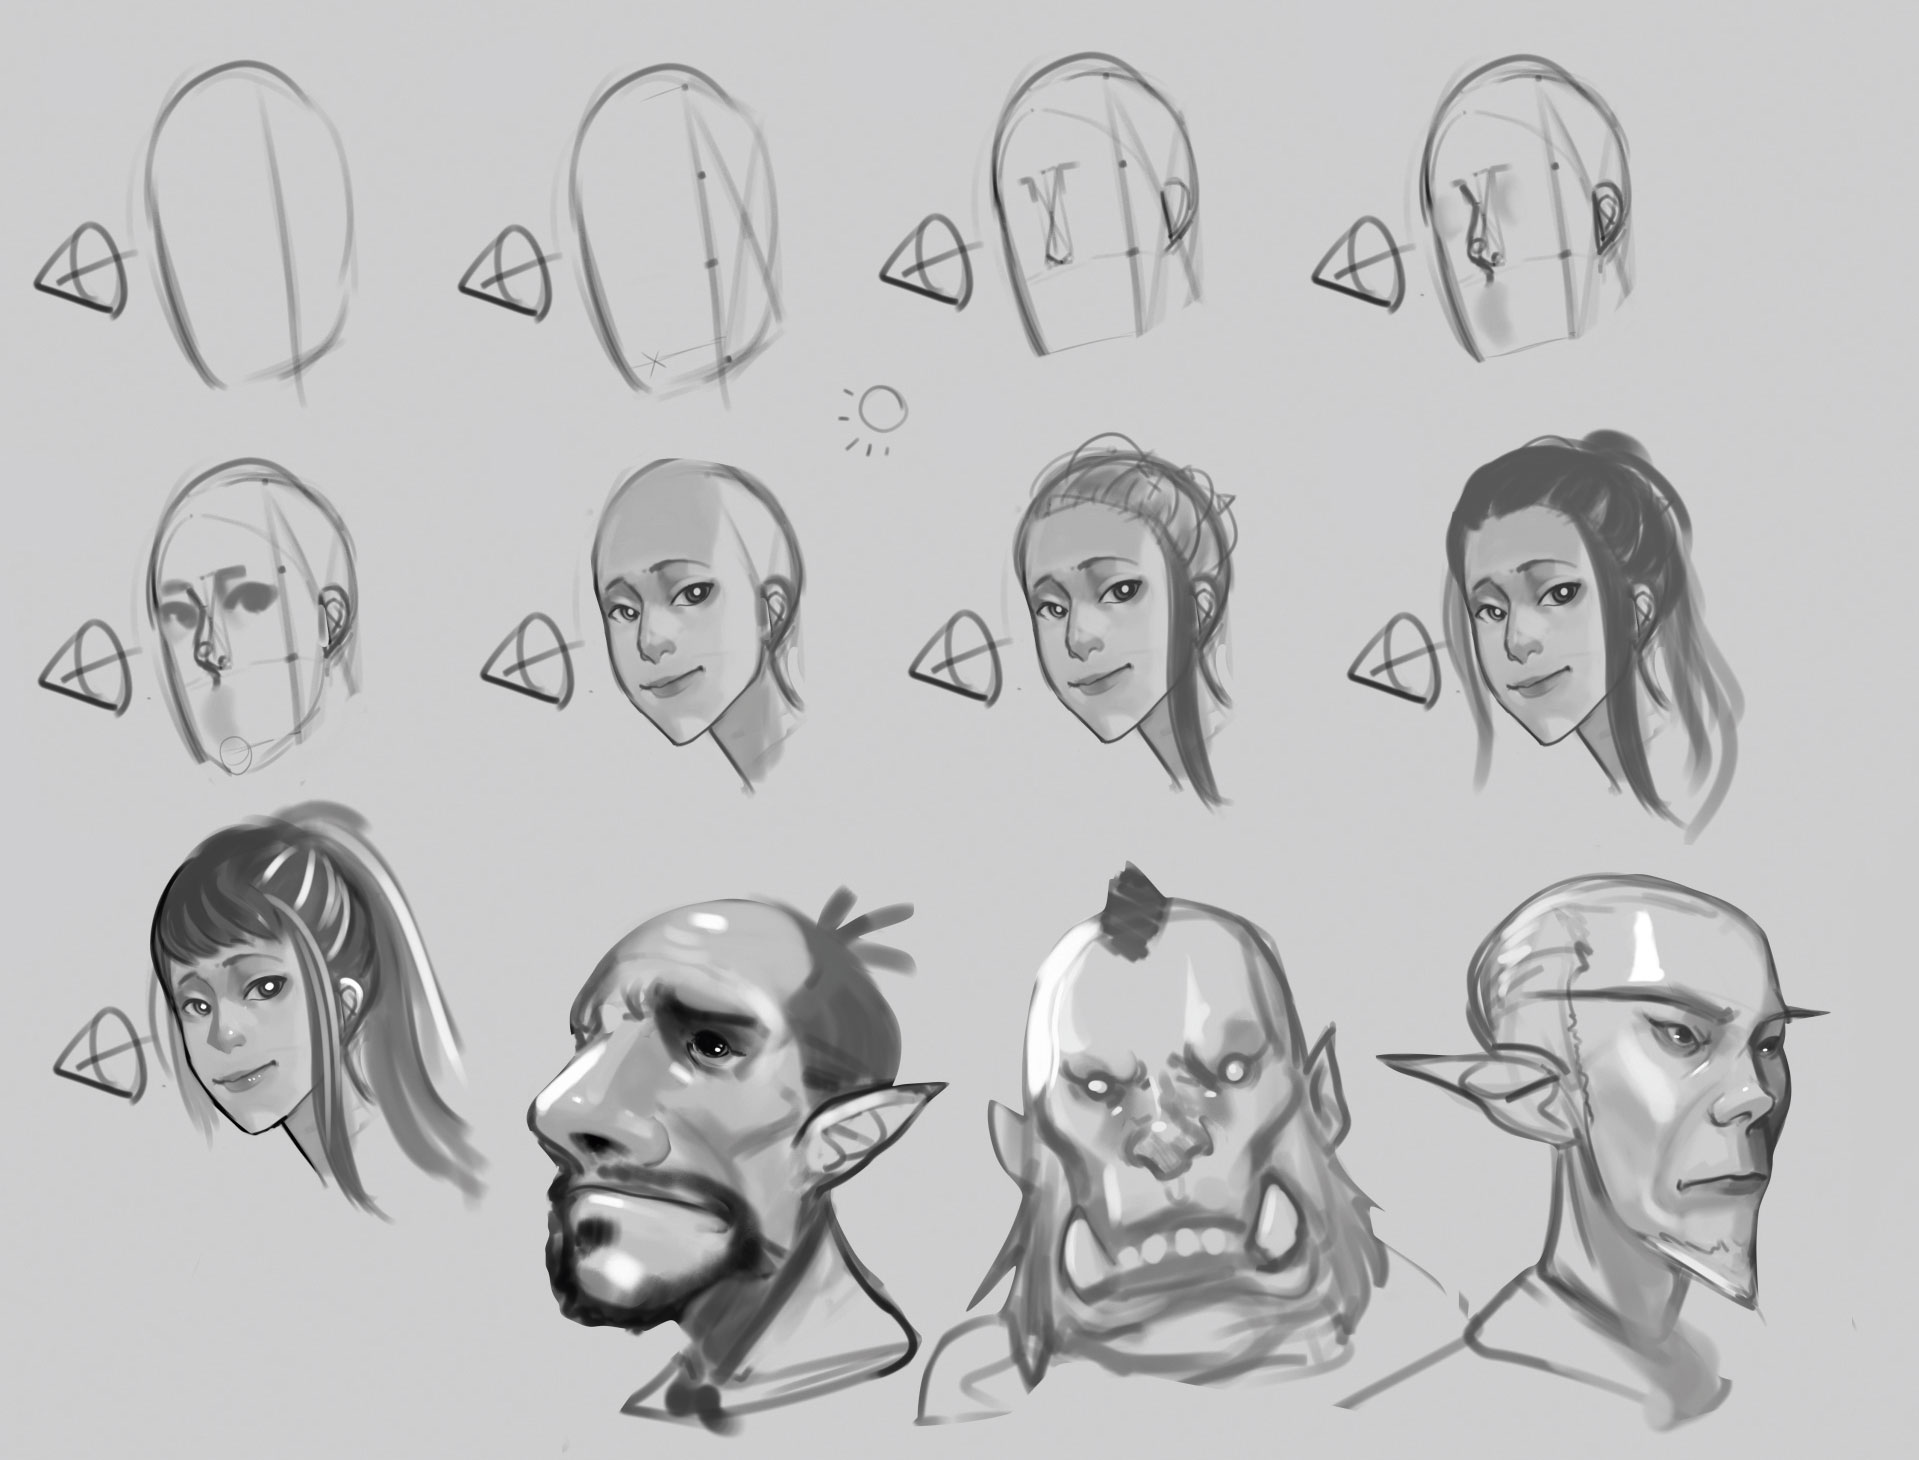
The key expressive features of the human face comprise the mouth, eyebrows and eyes. When I draw a figure that has a particular emotion I'll first doodle a cartoon-like image of the expression that I have in mind. After this sketch is complete, I'll try to pick out certain facial aspects within the expression. Is the mouth open? Are the teeth clenched? What do the eyebrows look like in the simple expression? I'll take note of those features and keep them in mind while I draw a refined version of the character's design on top of the initial sketch.
05. Draw forms
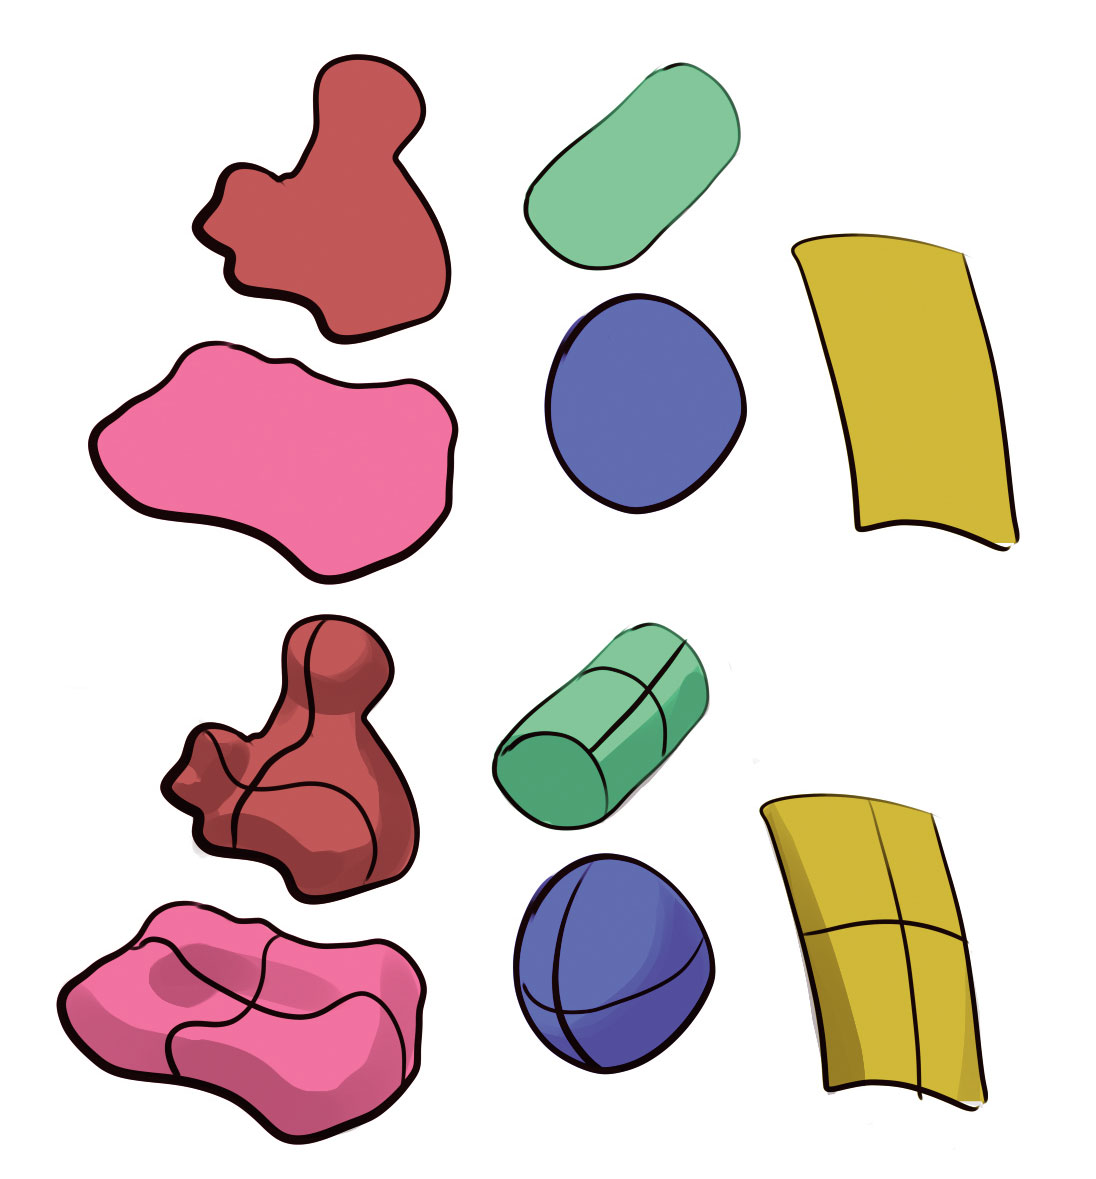
(Image: © Zakary Lee)
Here are a collection of shapes (top of image). Drawing a line across these shapes will give a sense of depth to the object, turning it into a 3D form (below). After sketching the shape design, I think of them as forms so that I can shade accordingly to the direction of light in the composition. This is good practice when drawing different-shaped heads.
06. Get the head measurements right
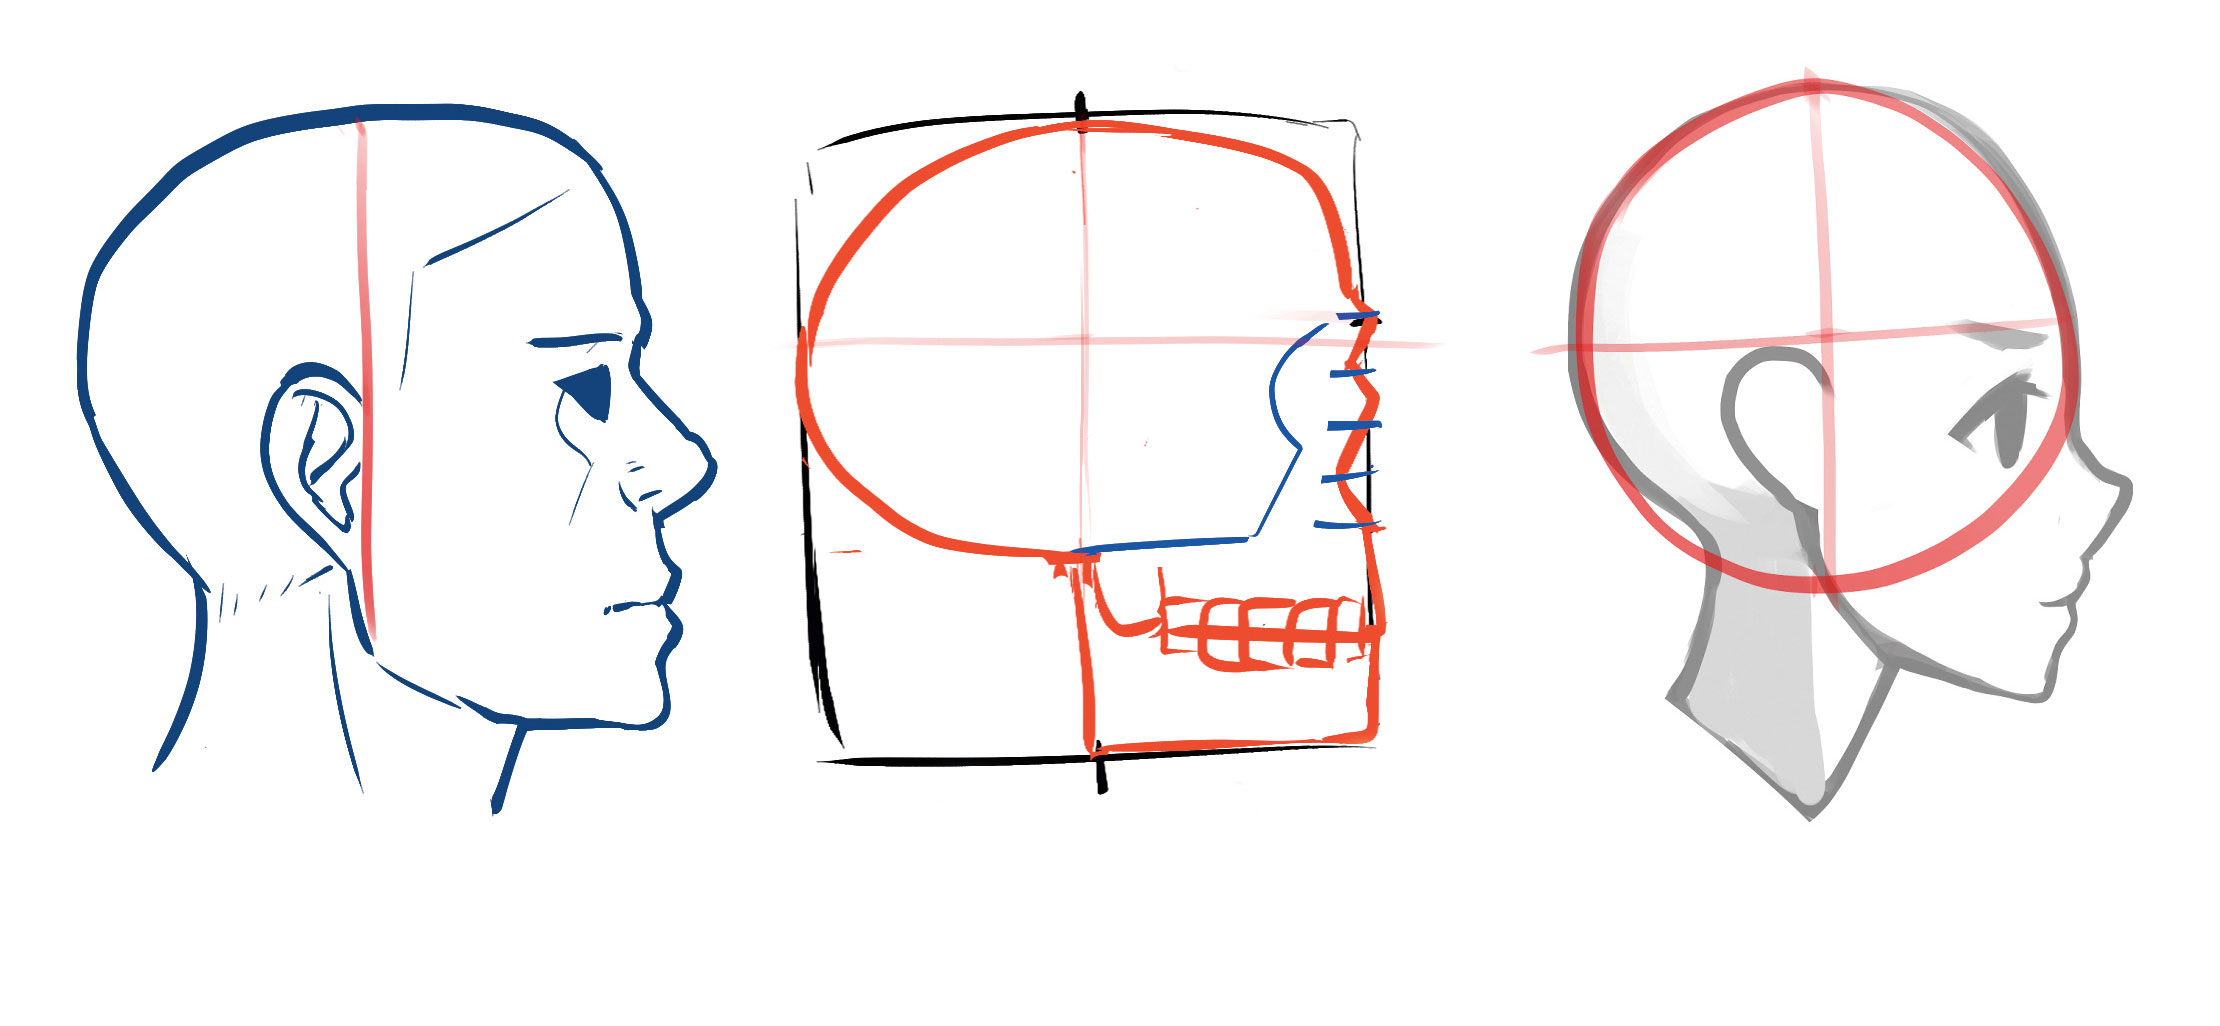
(Image: © Zakary Lee)
Manga characters tend to have exaggerated features such as big eyes and tiny noses, but I feel that the profile of the skull should still be consistent with the measurements of the human skull. Above is a simplified drawing of a skull, with the braincase and the facial bones in proportion with each other. Compare this to a more 'manga' head and you can see that the proportions are pretty similar. The ears still sit on the vertical half of the braincase, while the brow line lies on the horizontal half of the braincase.
07. Create manga fangs
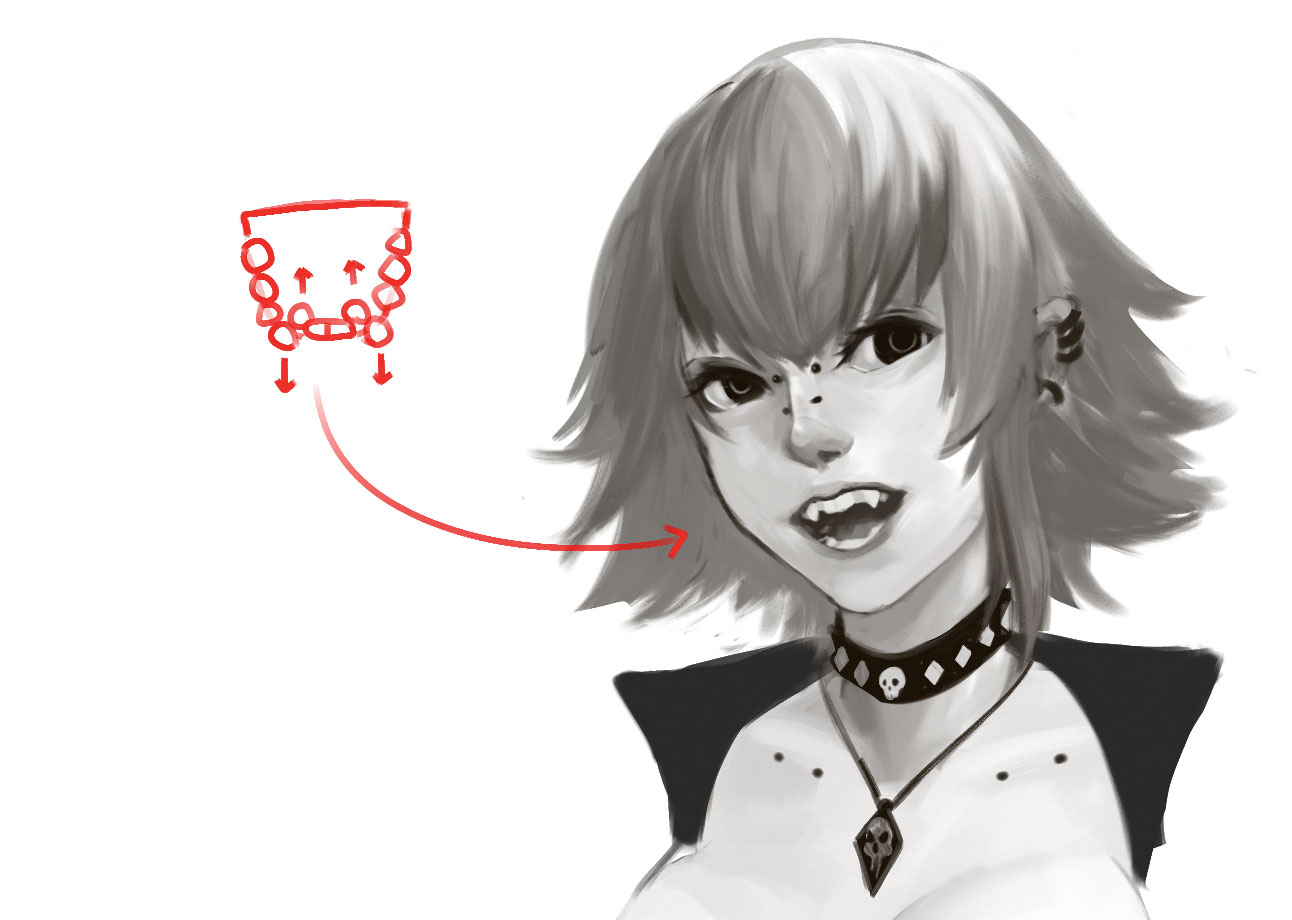
(Image: © Zakary Lee)
Teeth are one of the things that I really like to draw, and I don't usually draw perfectly straight teeth. Some manga or anime characters have "cute little fangs" that give them a sense of unconventional cuteness. I incorporate this look into some of my characters, although I'll mix things up by painting crooked teeth, some teeth that are pushed to the back and canine teeth that are pushed to the front.
08. Use light and shadow on the nose
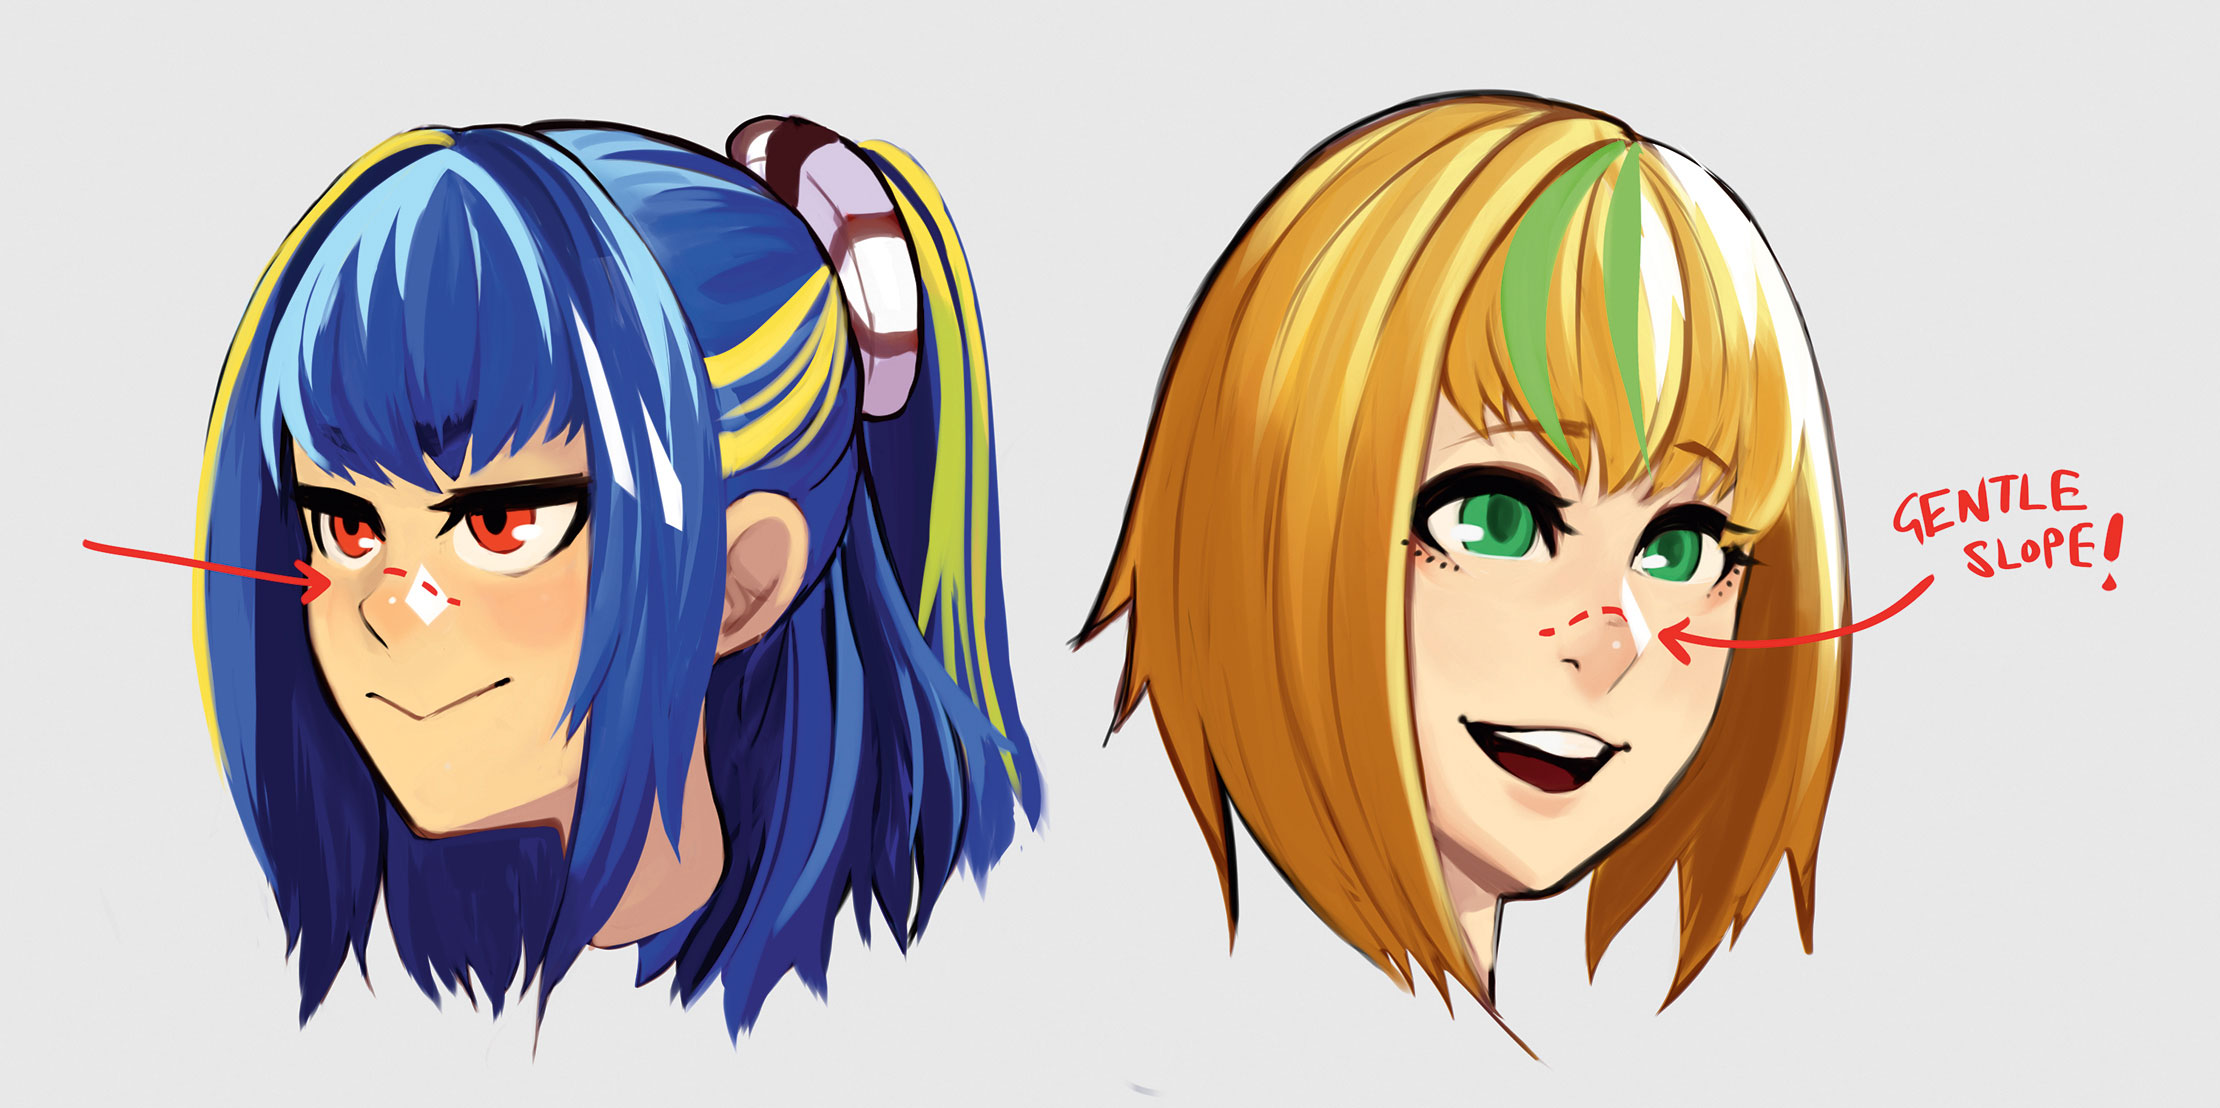
(Image: © Zakary Lee)
The nose bridge area of the face is actually a slope, and the protrusion would be less pronounced on a manga-styled character. Instead of drawing a hard line to indicate the nose bridge, I use the shadow or highlights with a sharp edge alongside the nose, which highlights the form of the nose bridge.
09. Create frontal head tilts

(Image: © Zakary Lee)
Try visualising the head tilt from the profile view. Using a circle and a box, I can visualise what the head tilt will look like from the side. I draw vertical lines extending from key features such as the chin, centre of the braincase, ears and the top of the head. This enables me to see what I'll need to paint when attempting to draw the head from the front. Above are examples of a manga character's head tilted up and down. Remember to draw the underside of the jaw when drawing a tilted-up head, and the crown when drawing a head that's tilted down.
10. Use a swimming cap for head angles
(Image: © Zakary Lee)
Drawing a swimming cap can help you to determine the angle of the head. Visualise a swimming cap with a seam in the middle and put that on your character. By covering all your character's hair and ears, you can now focus on drawing the facial features. Furthermore, you can use the cap's edge as the hairline, and because swimming caps cover the ears, I can draw the ears behind this edge with confidence, thus placing them in the right position.
11. Keep the drawing of the eyes simple

(Image: © Zakary Lee)
The curvature of the eyeball makes it complicated to draw at an angle and symmetrically, so keeping it simple will improve your skill at drawing realistic eyes quickly and relatively easily. Furthermore, take note of the shape of your character's eyes. Does the eye have an inward or downward tilt? Is the iris normally small or large? These will help you sketch your character's eyes at more complex angles.
13. Start with a flat colour when painting eyes
(Image: © Zakary Lee)
When sketching and drawing the eyes, paint the whole iris as a flat colour. It can be the same colour as your sketch brush. Painting the whole iris during the sketch phase will help make the sizes of both irises consistent with each other. It also makes it easier to compare and check whether both irises are the same size or not.
14. Use the eyes to explain the lighting
(Image: © Zakary Lee)
During the painting process, I'll spend a little time rendering the upper and lower eyelids. Because the eye socket is concave in shape and the light source is coming from an upwards direction, I paint the upper eyelids in a dark value and the lower eyelids in a lighter value.
15. Pick an iris colour based on your composition
(Image: © Zakary Lee)
Finally, I return to detailing the iris. I'll take a look at the overall picture and colours that I've used and then decide what colour the iris of the character should be. Because the painting features predominantly red colours, I decide to go with a green colour for the eyes. I also save my white value for the very end, applying a little highlight to the eyes.
16. Use shapes in your character designs

(Image: © Zakary Lee)
Whenever I've run into a brick wall when attempting to design an original outfit for a character, my solution is to duplicate a character's head a few times and then doodle whatever shape that comes to my mind alongside each one. So I'll focus on a single shape – a crescent or triangle, say – and then design a costume which resembles that shape. This method works with hairstyles, too.
16. Draw hair in clumps
(Image: © Zakary Lee)
You don't have to draw every single strand of hair. Instead, I recommend drawing hair as groups of shapes. Start with big shapes such as the whole fringe, back of the head and any ponytails or pigtails that the character might have. Break those big shapes down into medium-sized shapes and then into smaller clumps of hair. You can then add single strands of hair afterwards for added detail.
17. Experiment with different methods
(Image: © Zakary Lee)
Above is a method of constructing the head with a rounded-edge box instead of the traditional egg shape. I also use the same method to draw three fantasy characters. I skew and manipulate the human skull proportions to fit fantastical characters. Make the eyes smaller, the jaw bigger, or even enlarge the nose. You can use different construction methods to either draw people in a similar style or draw different styled characters, all using the same construction method. It's all about finding the form of the subject that you're drawing. There are many methods of constructing heads, I would suggest testing and trying every one of them that you can find out there! Find a method that suits your art, or develop one for yourself.
This article originally appeared in ImagineFX , the world's best-selling digital art magazine. Subscribe to ImagineFX here .
Read more:
- How to colour your manga art like a pro
- How to create an authentic manga comic strip
- 15 tips for better manga characters
Zakary graduated from DigiPen Institute of Technology (Singapore) with a BA in digital art and animation. He now works at Collateral Damage Studios.
Related articles
Drawing Anime Heads At Different Angles
Source: https://www.creativebloq.com/how-to/manga-faces
Posted by: hortonextob1973.blogspot.com
0 Response to "Drawing Anime Heads At Different Angles"
Post a Comment